Ever wonder how you integrate social accounts into your Django web
application?
It is an essential skill as a software developer or web developer to keep this
skill under your belt. Here we will do it step by step with code examples. I
assume you know all the basic commands of python and Django. Below I will use
several commands to continue the project.
First I will create a directory.
mkdir django-allauth-tutorial
go the that directory
cd django-allauth-tutorial
Before creating a virtual environment, ensure you have installed python
and the virtual environment. Suppose you are unsure whether you have those
installed or not, please watch my
Django Basic to Advanced Tutorial.
To create a virtual environment
python -m venv allauthvenv
To activate a virtual environment
allauthvenv\Scripts\activate
To install Django
pip install django
To start the project
django-admin startproject config .
You can give any project name as you wish but make sure that the name makes
sense.
To create a database
python manage.py migrate
To run the server
python manage.py runserver
After starting the server, go to the web explorer and write 127.0.0.1:8000; if
all goes well, it shows you the welcome page saying everything has been
installed successfully.
To stop the server
ctrl + c in windows and on mac. control + c
Now we will install Django-allauth third-party package to work on our social
login. To install Django-allauth, write.
pip install django-allauth
Social login using GitHub account
Next, we will connect our project and other packages and apps with the project
setting files. But, first, go to the config/setting.py files.
'django.contrib.contenttypes',
'django.contrib.sessions',
'django.contrib.messages',
'django.contrib.staticfiles',
'allauth.socialaccount.providers.github',
Ensure all the added apps are in order; otherwise, it will not work. Next, we
have to add allauth the backend stuff.
AUTHENTICATION_BACKENDS = (
#used for
default login eg admin panel
'django.contrib.auth.backends.ModelBackend',
# used for
social authentication
'allauth.account.auth_backends.AuthenticationBackend',
SITE_ID = 2
ACCOUNT_EMAIL_VERIFICATION = 'none'
LOGIN_REDIRECT_URL = 'home'
The above command is all written inside the setting file.
Now, we will fix our config/urls.py files. Write the below codes:
from django.contrib import admin
from django.urls import path, include
path('admin/',
admin.site.urls),
path('accounts/', include('allauth.urls')),
Now, do again the migrate command to update the database.
python manage.py migrate
Now go to the GitHub page. I assume you have a GitHub account. Once you are
logged in to GitHub, go to the setting and the Applications. Then write to the
web explorer :
https://github.com/settings/applications/new
That will open a new OAuth application registration page. From there, fill in
all the necessary options.
Here fill in the application name: Allauth Tutorial # You can give any name
as you wish
Homepage url : http://127.0.0.1:8000
Application description: (optional)
Application callback URL:
http://127.0.0.1:8000/accounts/github/login/callback/
Then press the register application button. That will give you the client ID
and client secret.
Next, we will create a superuser. To create a superuser, write
python manage.py createsuperuser
Now it will ask you to give your username, email, and password. Fill in the
information that will generate a superuser. Now, do once again migrate
command to update the database.
python manage.py migrate
Then start the server
python manage.py runserver
Now go to the admin page and log in to the Django admin page with
your username and password. The username and password were those when
you created superuser.
127.0.0.1:8000/admin
Then go to the site section of the admin panel and fill in those information
Fill in the domain name: 127.0.0.1 and display the name, which is
optional.
Next, go to the social application add button, fill in the provider,
client id, and client secret and move 127.0.0.1 to the right side of
the box. I pointed it out with the red line and finally saved it.
Now, we will create the config/views.py file and add the following
lines of code.
from django.views.generic import TemplateView
class Home(TemplateView):
template_name =
'home.html'
Next, we will add a folder inside the config/templates. And point it
to the setting file.
TEMPLATES = [
'BACKEND': 'django.template.backends.django.DjangoTemplates',
'DIRS': [BASE_DIR, 'templates'], # added new this line
'django.template.context_processors.debug',
'django.template.context_processors.request',
'django.contrib.auth.context_processors.auth',
'django.contrib.messages.context_processors.messages',
Once you have created a templets folder inside that folder, create an HTML
file config/templates/home.html. And the below lines of code:
<h1>Allauth Tutorial</h1>
{% if user.is_authenticated %}
<p> Welcome {{ user.username }}</p>
<a href="{% provider_login_url 'github' %}">GitHub
Signup</a>
Here first, we have added the socialaccount form and checked whether the user
is authenticated or not. If the user is authenticated, it will show the user
name, or else it will ask to register. So here it comes to GitHub login part
functionality.
Now add the home.html file URL to the config/urls.py file.
from .views import Home
urlpatterns = [
path('',
Home.as_view(), name='home'),
]
Now, go the web explorer and write 12.0.0.1:8000. It will take you to the
signup page. Press the signup
Once you press the signup, it will take you to the login with Github page
option.
Press the continue button then it will take you to the below similar page.
Select the Authorize button now; it will authorize your application, and you
can log in to your application by using your GitHub account information. If
you see the information below, you are done with Github login to your
application.
Social login using a Google account
Now we will see how to do social login with the google account on your
Django application. The way we have earlier with the GitHub account is
almost the same as the Google account. Now, we will see in a practical way
how you can do it. So let's do it now.
First, we will add inside the installed app section below lines of code.
'allauth.socialaccount.providers.google',
Next, we will add the below lines of code inside the setting files. But
those lines of code are optional, as mentioned in the Django-allauth
documentation.
SOCIALACCOUNT_PROVIDERS = {
Before running our server, we will do our migrate command to update our
database as we have added a service provider now, google.
python manage.py migrate
Another thing we need to update is our home.html page. Write down
{% load socialaccount %}
<h1>Allauth Tutorial</h1>
{% if user.is_authenticated %}
<p> Welcome {{ user.username }}</p>
{% else %}
<a href="{% provider_login_url 'github' %}">GitHub
Signup</a>
<br>
<a href="{% provider_login_url 'google' %}">Google SignUp</a>
# added those line
{% endif %}
Now, we will go to the google developer console. Just write on the web,
explore google developer console and select that page. I assume you have a
Gmail account.
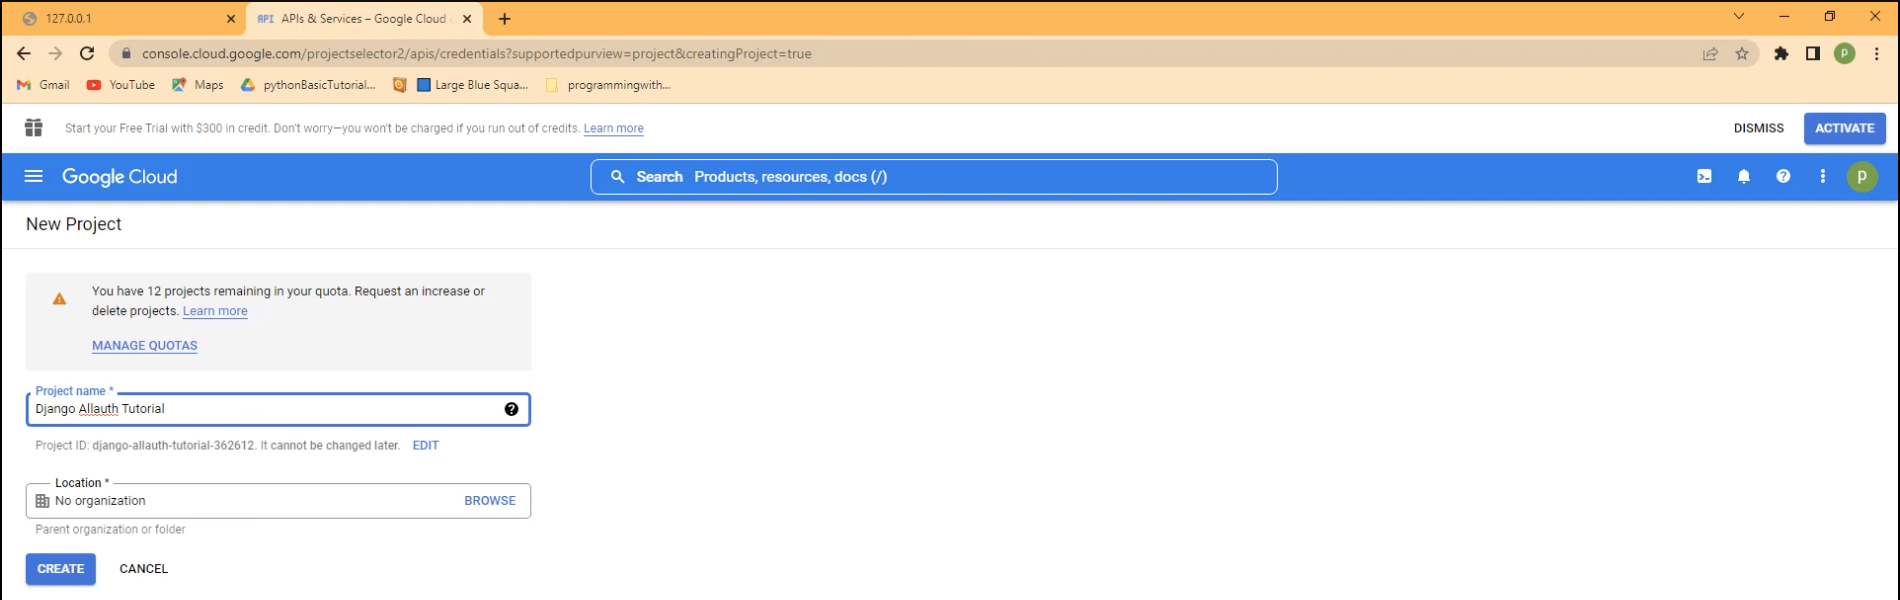
Once you are on the google developer console, press the credential button
and select a new project.
Now write the project name and press the create button.
Now select the configure the consent form and select the external radio
button, and press the create button.
On the next screen, fill in the App name, your email address, and the
developer contact email; you can use the same email address, press save, and
continue.

Once this part is done, on the next screen, select the create credential, then
select OAuth Client ID.
On the next screen, fill the application type as a web application and
give the name of the application and add URLs http://127.0.0.1:8000 and
redirect URL http://127.0.0.1:8000/acounuts/google/login/callback/
After filling in all the required information, we will get the client ID and
client secret.
Next, we will start our server and log in to the admin panel.
127.0.0.1:8000/admin
login with your username and password. Once on the admin panel, select the
social application and add google as a service provider, client ID, and
secret.
Now it's time to test our application. Run the server and go to
127.0.0.1:8000, and you see the option to choose either Github or google.
Choose this time, google, and it will ask you to authorize the Gmail account
to log in to your application.
Press the email, and on the next page, write a new user name email is
optional press continue, and finally, you will land on your Django web
application.
We can still watch the whole tutorial below the video and much more. I hope
you enjoyed this tutorial. Please thumbs up and like, share and
comment.
Below the video, you will be able to watch how to do all of these on
youtube.